CAVU FPV for DJI Go Drones
1 What is CAVU FPV?
The CAVU FPV app is an Android app that allows you to fly your DJI drone from an immersive first person view (fpv) using your smartphone and cost effective virtual reality (VR) goggles.Using VR goggles brings the flight experience to a whole new level. Without breaking the bank...
Here is a short video giving an introduction to the CAVU app.
What does CAVU stand for?
CAVU is an acronym used in aviation circles meaning "Ceiling and Visibility Unlimited." Commonly used by pilots as slang to describe anything that is desirable or sought after.

1.1 What is needed?
What is needed to run this app:
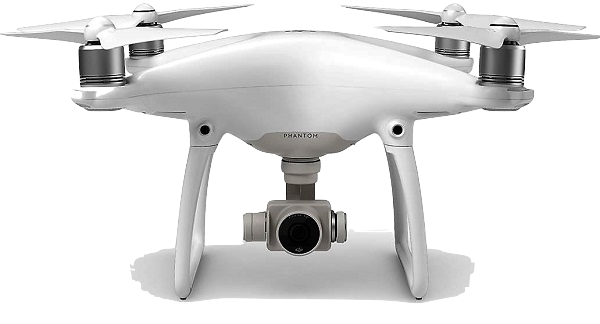
- a DJI drone (Phantom 3 or newer); if you want to use a Phantom 3 Standard, please read this
- a smartphone running Android 4.4 or newer and a high resolution (at least Full HD = 1920*1080 pixels, better Quad HD = 2560*1440 pixels or 4K, see "The math" below)
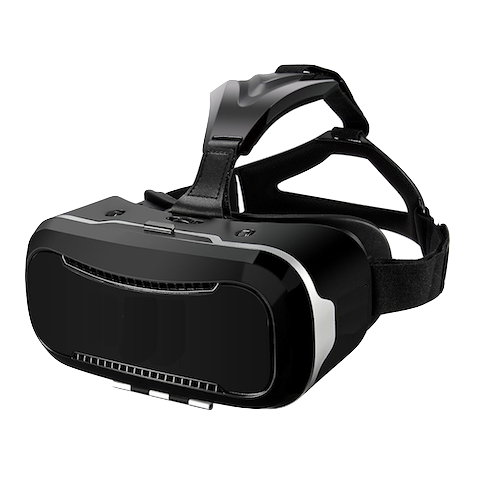
- VR/3D goggles
- e.g. "google cardboard" compatible
- please note that Samsung Gear VR goggles cannot be used because on older models it is not possible to connect the smartphone to the remote controller via USB - the USB port is blocked by the Gear VR; on newer models an USB port exists, but the connection fails)
- To experience the first person view with a VR headset, it is cruicial to have as many pixels as possible.
- The 5.5" versions of the iPhone currently only have Full HD which is not optimal for a good flight experience (we recommend using devices with Quad HD or 4K).
The math:
- Full HD = 1920 * 1080 = 2,073,600 pixels
- Quad HD = 2560 * 1440 = 3,686,400 pixels = 1.77 times the pixels of Full HD
- 4K = 3840 * 2160 = 8,294,400 pixels = 4 times the pixels of Full HD
1.2 What are we recommending?
During the app development we found the following hardware to be recommendable:
- drones
- the Phantom 4 Pro (without the built-in monitor)
- the endless number of sensors make flying as easy as never before
- the superb 20 mega pixel camera takes stunning fotos
- the ability to control the yaw of the camera/gimbal via head tracking
- the Mavic Pro
- for its mobility and "ready to fly" time
- the Spark
- for its completely wireless operation (no USB cable required between remote controller and smartphone)
- Android smartphone
- VR goggles
- 3D/VR goggles that allow to adjust the eye distance and that allow you to keep your glasses on
- in case your smartphone does not have a very high resolution, you can try "non-VR goggles" instead
- flexible USB cables
- in case you are using the Phantom 3 standard, you can use Bluetooth remote/game controllers to take photos and record videos
1.3 Where to download
The app can be downloaded in Google Play store.
Please note:
Although the app can be downloaded and tested for free, an in-app-purchase is needed to unlock the "flight time restriction".
Please read this for more detailed information.
1.4 What's new? (Release notes)
You will find the information about the latest features in our Release Notes document.
The "Closed" items in the list are already available.
The "Active" items are currently in development.
The "New" items are planned to be realized in the near future.
1.5 App languages/translation
The app is currently translated to German and English only (the documentation is available in English only).
We don't want to use automatic translation services because we think the result is not optimal (and looks funny/strange in some cases). Using professional translation services for all languages is beyond our budget.
If you want to see the app in your native language anyway, you can support us to translate it - it's around 125 labels/short texts to translate (excluding the help pages).
2 Who are we and what is our mission?
We are a small group of passionate software developers (usually working for corporate companies and on our AirPlay Multiroom audio solution/app).We are in the RC hobby for quite a while, mainly cars and helicopters.
In 2016 we were infected by the "drone virus".
Not satisfied with the (fpv) controller apps available, we decided to do something about that...and started the development of our own controller app.
Because the result is quite good and we wanted to share our love of flying fpv, we decided to publish the app on the Google Play Store.
Our mission is to provide the best flying experience (flying is fun!), without loosing the feature of taking great pictures and videos while on the flight... For us a 100% stable and easy to use app is more important than a feature-overload.
If you have ideas how to further improve the app or you are experiencing problems with our app, please contact us via the "Contact/Feedback" button in the
main menu of the app. Alternatively you can send an email to the address linked in the
Google Play Store.
We usually answer within 2-3 days.
3 Starting the app
After downloading the app from Google Play store, it's time to start the app for the very first time.Some things are to consider which are described a bit more in detail in the following sections.
3.1 Android 6 and app permissions
In order to make the app run properly, some permissions are needed.
Apps developed for Android 6 (M) or newer have to request these permissions explicitly.
When you start the app for the very first time, additional dialogs will be opened that will ask you for the permissions individually.
The following permissions are needed:
- Make and manage phone calls - The SDK provided by DJI needs this permission to get a unique device identifier. Neither phone calls are started, nor your contacts are read. All DJI compatible apps (incl. the DJI GO app) need this permission. But apps that are developed before Android 6 won't show that explicitely.
- Take pictures and record video - This is used to show the pilots perspective.
- Access this device's location - This is needed to calculate the home position of the drone.
- Access photos, media, and files on your device - To store temporary data and log files.
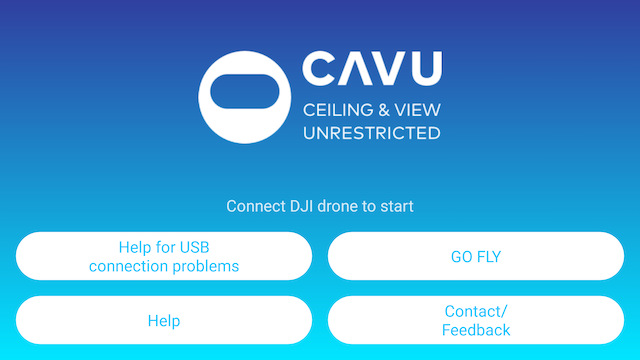
3.2 The main menu
The first thing you will see (after accepting the permissions) is our main menu.
Here you have access to the main functions of our app:
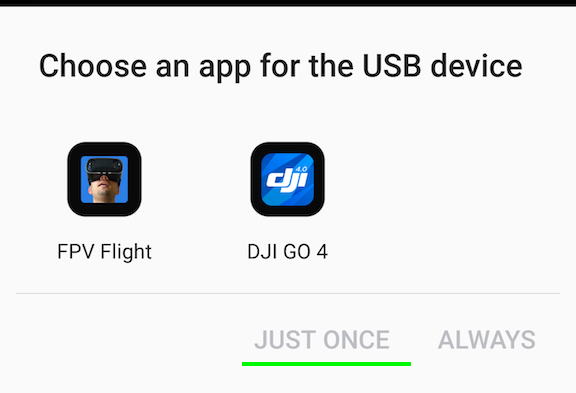
3.3 Potential USB connection problems
If you have installed multiple DJI compatible apps on your android device and you connect it to the DJI remote control via USB, a dialog will pop up asking for the app to use.
When you select the app, please always press "Just once" or deselect the "Use as default app" checkbox.
Otherwise the selected app is always started whenever the cable is connected.
The other apps will not be able to connect to the drone in this case.
If you pressed "Always" accidently, we added some features in the app how to solve this problem easily.
Have a look at "Help for USB connection problems" in the
main menu.
If the message "Unfortunately, System-UI has stopped." appears, this is the result of a bug in the Android 6 operating system. In this case, NONE of the DJI app will work any more.
Unfortunately, the only "solution" in this case is to have installed max. one DJI compatible app at the same time.
Sorry for that!!
4 Demo mode and in-app-purchases
Bad news first:This app is not free.
Developing and maintaining software is very time consuming - and with that very expensive.
The good news:
You don't have to buy a pig in a poke.
You can download the app for free.
It will run in "demo mode" - which means you can fly your drone using our app for 5 minutes on each app start.
After 5 minutes of flight, a semi transparent overlay will appear over the flight screen telling you the flight time is over.
You will still be able to fully control your drone and also see the live-view image.
If you like the app, we would be happy if you share it with your friends.
The more people downloading (purchasing) the app, the more time we can invest to further improve it.
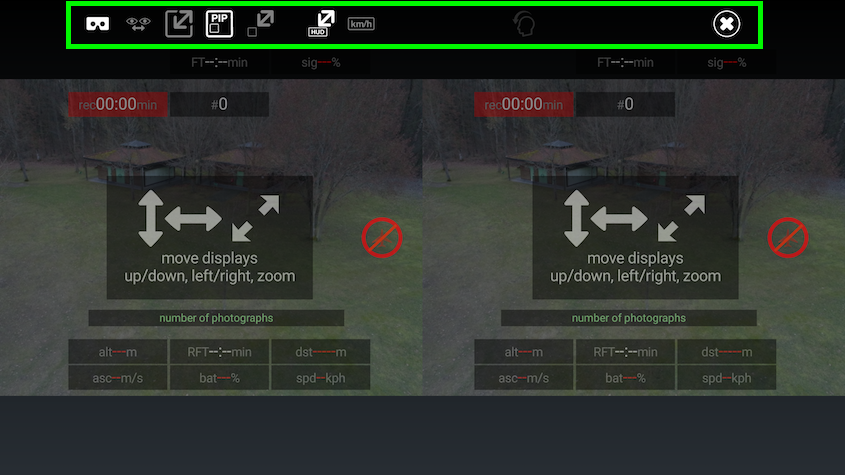
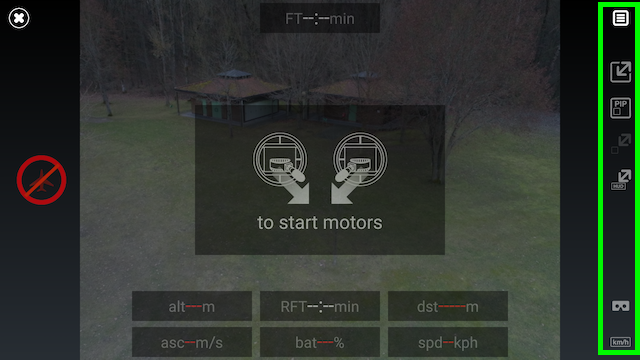
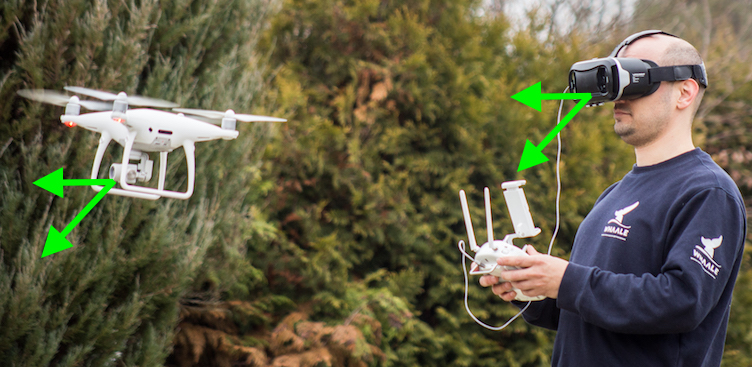
5 VR Flight Mode ("GO FLY")
The "VR Flight Mode" is the main feature of our app.
It allows you to use your smartphone together with VR goggles as a FPV headset.
For this purpose, there are 2 images shown side by side.
The following sections will describe how to handle the vr mode and how to configure it according to your preferences.

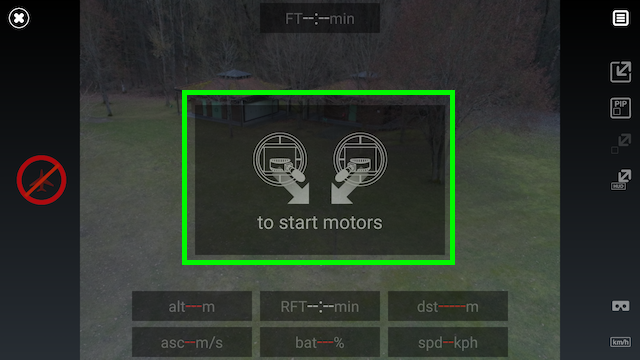
5.1 On-screen help/tutorial
We tried to make our user interface as self-explanatory as possible.
For this reason we added some tutorial overlay on the flight screen.
It will give you hints what to do - especially when using the app for the first time.
5.2 The configuration menu
Depending on the flight mode, the configuration menu is either at the top of the screen or on the right hand side.
When you are in VR mode and the smartphone is inserted into the vr goggles, the menu is hidden automatically (using the proximity sensor).
In non-vr-mode the menu can be hidden by pressing the menu button in the top right corner.
5.2.1 Controlling the camera gimbal via head movement
Usually, the camera gimbal is controlled with the wheel on the upper left side of the remote controller.
To allow a more immersive flight experience, the app gives the possibility to
control the gimbal via head movement.
To enable/disable this feature, tap the corresponding icon in the configuration menu once the drone is connected (after installation of the app, this is enabled by default).

The app allows the control of the gimbal pitch within a 120° range (-90° down; +30° up) for almost all of the dji drones.
The Spark only supports a 90° range (-90° down; 0° up).
For drones of the Phantom 4 product range (Phantom 4 standard, advanced and pro) it is also possible to control the horizontal movement (yaw) of the gimbal by rotating your head.
Please note
Although this feature works for the dji Mavic together with the dji goggles, this is not possible for 3rd party apps - we are currently trying to contact dji...
To make this feature work, you have to define a "center" direction.
You can do this by pressing and holding the c1 button on the remote controller for 1.5 seconds while you are in flight screen.
This triangle indicates the direction of the gimbal in relation to the drones front direction/orientation.
Moving your head to the left/right will rotate the camera/gimbal accordingly.
Please note:
- The process of defining the center position has to be done after each launch of the flight screen.
- If you don't want to control the yaw, simply skip the process.
- To reset the "center" position during flight, repeat the process of pressing and holding the c1 button at any time.
5.2.2 Enable/disable HD live video image
On some devices there is a delay/latency of the live video image.This potentially comes from using slower smartphones that cannot handle the high resolution video preview images very good.
To support also slower devices, it is possible to activate/deactivate HD live video transmission.
For this purpose you will find a "HD" button in the configuration menu. Tap it to enable/disable HD live video transmission.

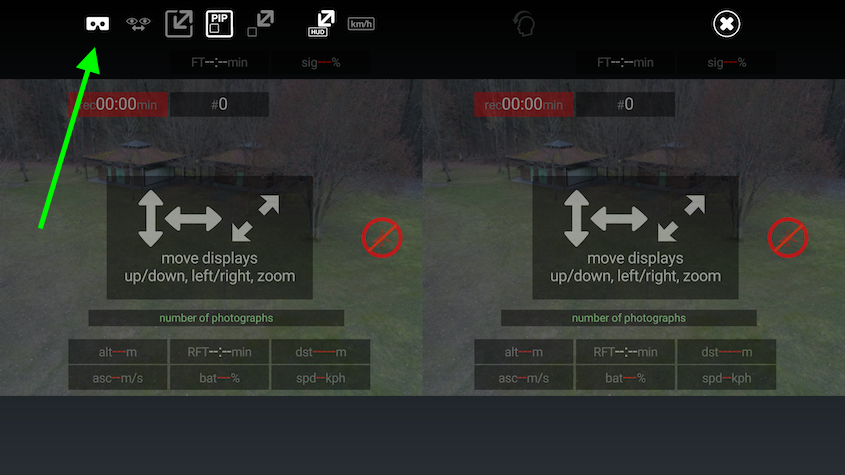
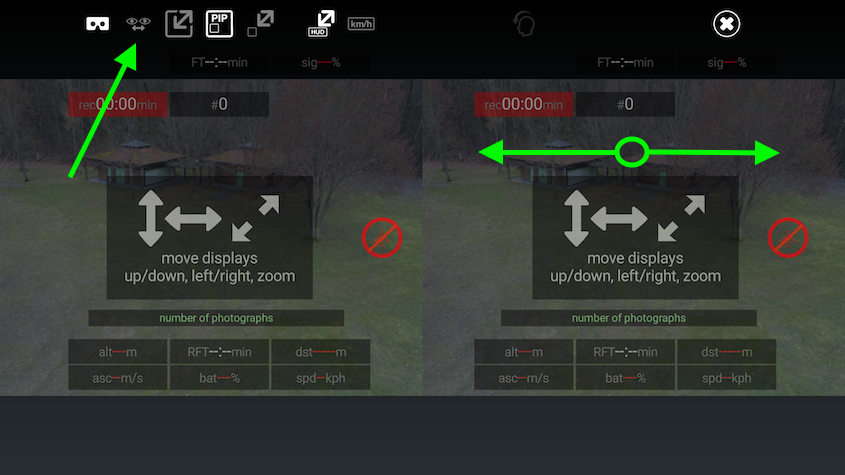
5.2.3 Switch off VR goggles mode
You forgot your VR goggles at home? Or you are just not in the mood to fly vr?No problem, simply switch back to the "traditional" view.
To enable/disable the goggles mode, simply press the goggles icon in the menu.
You can define the layout for goggles and non-goggles mode individually.
5.3 Showing live preview image
5.3.1 Show live view of the drone
The main feature of the app is the ability to control your drone from an immersive first person view using vr googles.
For this purpose the live image coming from the drones camera is shown twice on the display (once for each eye).
Because the drone only has one camera, this is not a stereoscopic image.
Together with the live preview you will see a couple of flight data displays (head up displays = HUD).
5.3.2 Switch between drone view and ground view
Sometimes it is useful to check what's going on around you while flying - e.g. if other people are passing by.For this purpose it is not required to take of the vr goggles.
If you press the c1 button (rear left of the remote controller) you can toggle between the drone live image and your smartphones camera image.
In case the picture of the smartphone camera is
upside down, press the corresponding menu item to rotate the picture by 180°.

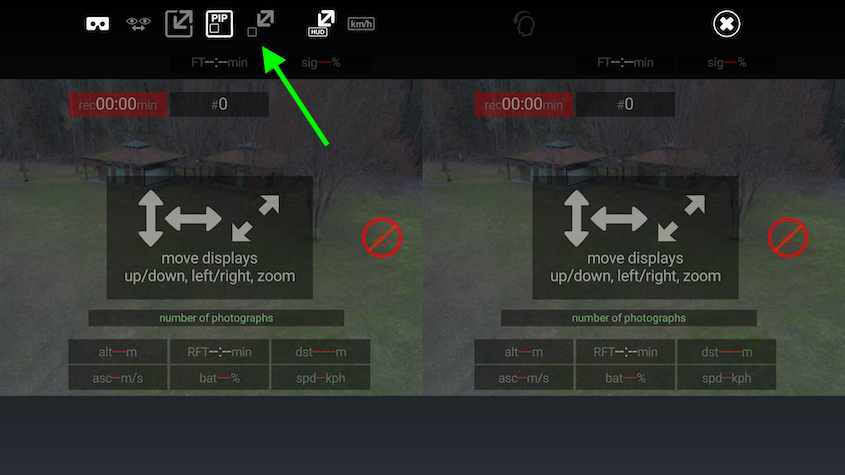
5.3.3 Picture in Picture (PIP) mode
If you want to keep an eye on your surrounding during flight without the need to toggle between the camera perspectives, you can use the PiP (picture in picture) mode.
You can toggle the images by pressing the c1 button.
5.3.4 Zoom the smartphone view & toggle focus mode of smartphone camera
When you are in "ground view" mode (the picture of the smartphone camera is shown) you can use the right click wheel on the remote control to zoom in and out the picture.With that it is possible to watch the drone from the ground even it is a bit further away.
If you click the right wheel, you can toggle the focus setting of the smartphone camera.
If you are using the Mavic Drone:
- push the "5D-pad" up and down to zoom in/out
- use the c2 button to toggle the focus
- this also works for the "drone" view - you can zoom the picture + set the focus manually
5.4 Flight data displays (HUD)
During flight various flight data displays (head up displays / HUD) are shown.These displays are described in the following sections.
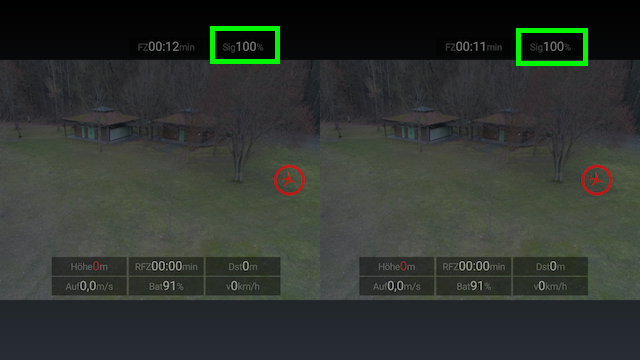
5.4.1 Signal strength
The signal strength display shows the quality of the video transmission signal between the drone and the remote controller.
If the strength is below 40%, the display gets yellow to indicate warning.
If the strength is below 20%, the display gets red to indicate a critical warning.
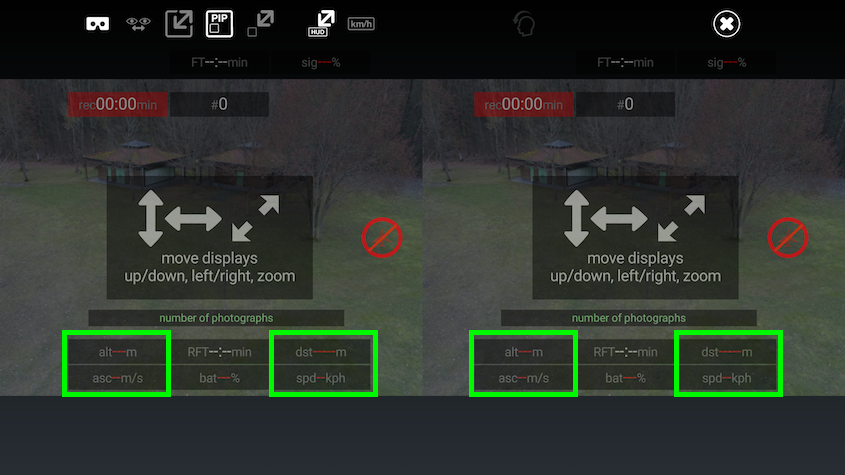
5.4.2 Height, distance and speed
There are 2 blocks of displays showing height, distance and speed related information.
The upper display of each block shows the height/distance of the drone in relation to the home point.
The lower display of each block shows the corresponding speed (rate of ascent/descent and horizontal speed).
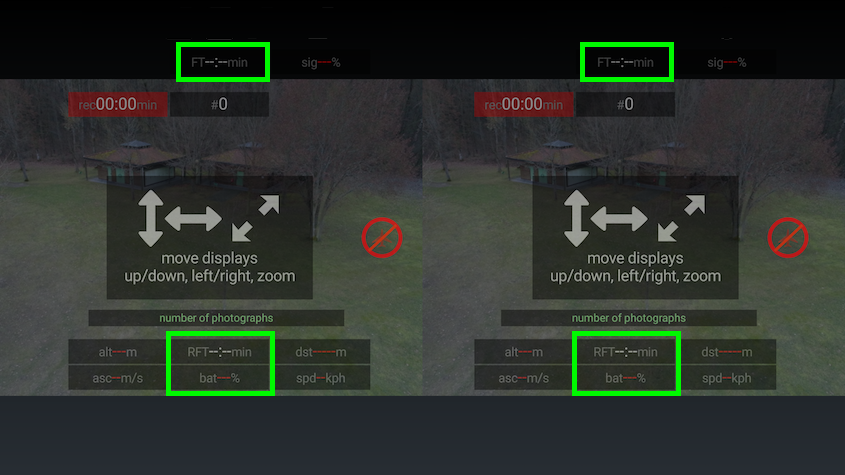
5.4.3 Flight time and battery status
In the top center you will find the information about the flight time with the current battery pack.
In the bottom center you will find the information about the remaining battery capacity (in percent) and the estimated remaining flight time.
The remaining battery display will turn yellow if the battery capacity drops under 50% to indicate warning.
If the capacity drops below 30%, the display will turn red to indicate critical warning.
5.4.4 Google maps display
With the Google Maps headup display you will know exactly where you are - all of the time.
You can enable/disable the display using the Google Maps button in the configuration menu.
The following information are shown
- in the drone perspective
- the current drone position (if known) = center
- the direction the drone is heading to = top
- the home point (if locked)
- a connection between the drone position and the home position
- in the ground perspective
- the current smartphone position (if known) = center
- the direction the smartphone/vr headset is heading to = top
- the current drone position (if known)
- a connection between the smartphone position and the drone position
5.4.5 Home point and drone location
The home point and drone location display has multiple purposes/states
- when no drone is connected, it shows a red circle which is striked through
- when a drone is connected, but the home point is not locked, it shows a red circle and the drone
- the drone symbol is pointing into the direction the camera is facing to (top = north)
- if the home point is locked the circle turns green
- it stays green as long as the drone is within a 5m range around the home point
- the circle is yellow as long as the drone is outside the 5m range but inside a 10m range around the home point
- if the drone is outside a 10m range around the home point, the circle will be replaced by an arrow pointing into the direction of the home point

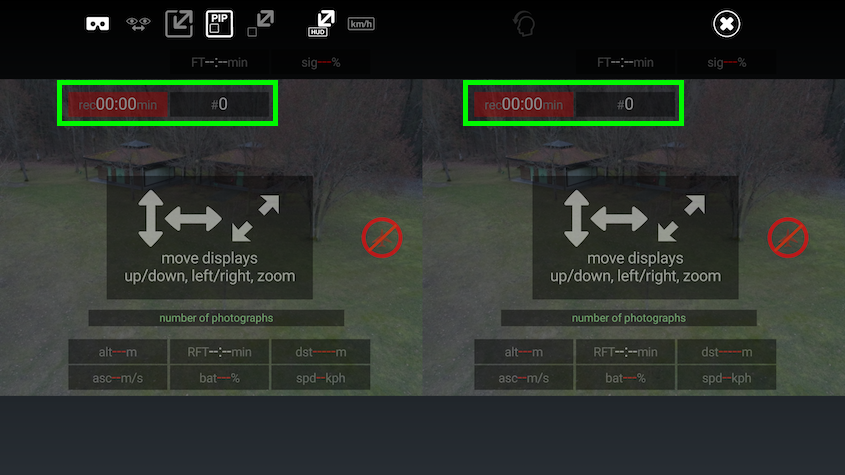
5.4.6 Photo and video recording state
During video recording, the display in the top left corner shows the duration of the recorded video.
If a foto is taken, the display in the top center shows the number of the foto (since the last start of the app).
Both displays are only showed when needed.
5.4.7 Important messages
If during flight something important happens that is not shown/indicated by the flight data displays, it is shown in the "important messages" display.
If during configuration mode a flight data display is tapped, the information message display will show a short description of the display.
6 Taking fotos and recording videos
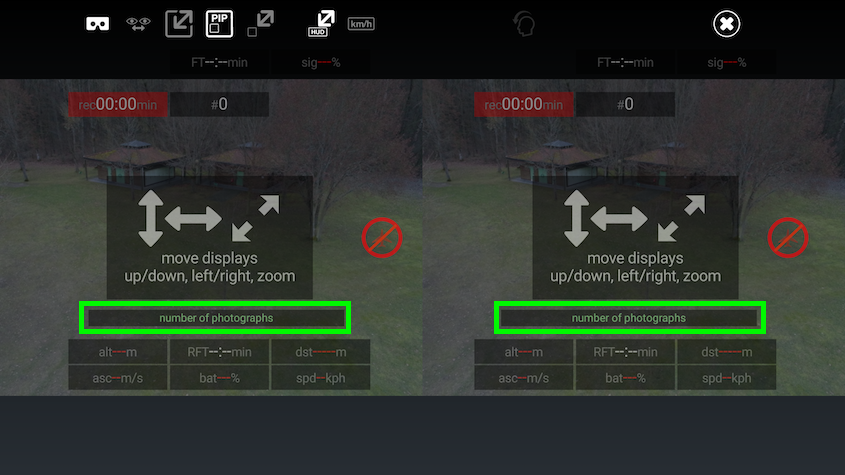
6.1 Taking photographs
To take a photograph, press the shutter button on the top right of the remote controller.
Fotos are taken in the highest available resolution with a 4/3 aspect ratio.
The
foto HUD will show the number of the foto for 2 seconds.
6.2 Recording videos
To record a video, press the record button on the top left of the remote controller.
Videos are taken in 4K resolution with a 16/9 aspect ratio.
6.3 Take photos and record videos using a bluetooth remote/game controller
The DJI Phantom 3 Standard does not have any additional/custom buttons on the remote controller to take photos or record videos.
This makes it hard to achieve these tasks when the smartphone is used in the VR headset.
To allow to take photos/record videos anyway, CAVU FPV allows to use Bluetooth game controllers to trigger the actions.
What you need is some kind of Bluetooth game controller, e.g. this one.

Please connect the controller to your phone using the Android Bluetooth settings as described in the user manual of the game controller.
If the controller supports multiple modes (mouse, keyboard, game controller), please make sure it is set to game controller mode.
Once it is connected, you can start CAVU FPV.
In the flight screen you will see a bluetooth icon.
This button has the following states/actions
- By default, the button is deactivated (light gray).
- If you press it and no game controller is connected, you will get a corresponding information.
- If you press it, you need to configure the controller-buttons you want to use for taking photos and recording videos. Please follow the instructions on the screen.
- Once the buttons are configured (and a controller is connected), the UI-button will turn white. You can use the controller-buttons to trigger the actions.
- If you press the button while it is white, you can stop/reset the configuration.

7 Configuring the user interface
The user interface is fully adjustable and can be configured to fit your requirements.The following sections describe how this can be done.
7.1 Adjusting the eye distance
If you cannot see the text of the flight data displays clearly, maybe the eye distance is setup incorrectly.If your vr goggles support it, please first try to adjust eye distance in the goggles itself.
If that is not sufficient, you can use the eye distance button in the configuration menu.
If the setting is active (the button becomes white) you can adjust the distance by dragging the preview image to the left/right.
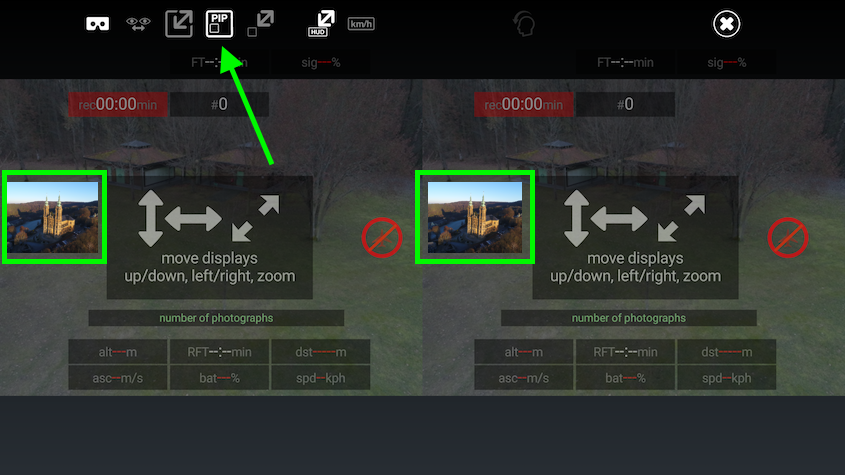
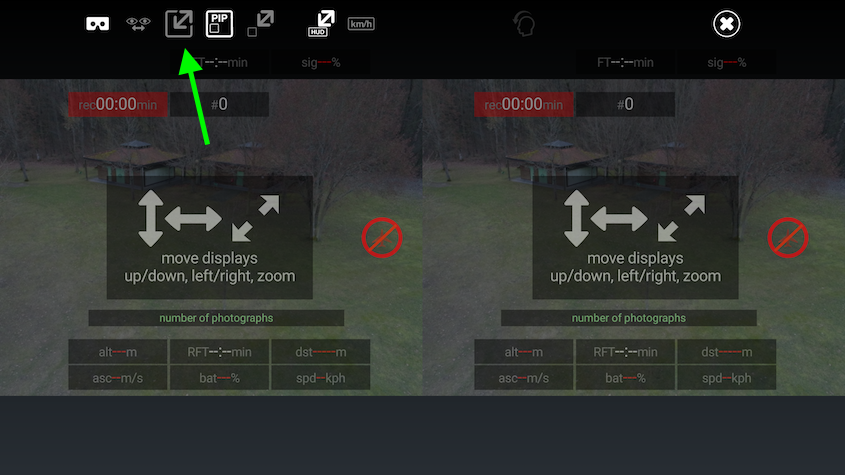
7.2 Move the live view image
By default, the live image is shown in the center of each eye so that it is completely visible.
By pressing the adjustment button in the configuration menu, you can adapt the position and size of the live image according to your wishes.
Simple drag the view to the desired position and use the 2-finger-zoom-gesture to adapt the size.
7.3 Move the second (PiP) display
By default, the PiP image is shown on the left hand size of each eye so that it is out of the way but still visible.
By pressing the adjustment button in the configuration menu, you can adapt the position and size of the PiP image according to your wishes.
Simple drag the view to the desired position and use the 2-finger-zoom-gesture to adapt the size.
7.4 Configure the flight data views
We positioned the flight data displays / HUD in a way we think it makes sense.But as the other views the location and size is fully adjustable.
By pressing the adjustment button in the configuration menu, you can adapt the position and size of the HUD according to your wishes.
Simple drag the view to the desired position and use the 2-finger-zoom-gesture to adapt the size (of all displays simultaneously).
7.5 Switching between metric and imperial units
By pressing the units item in the flight screen (showing "km/h" or "mph" depending on your current setting) you can switch between metric and imperial units.
8 Special hardware
This section describes some "special" hardware that limits or extends the default features of the app (or that require additional skills to get it working as desired).
8.1 The Phantom 3 Standard
The remote controller of the Phantom 3 Standard does not have any additional (custom) buttons to be used by apps.
The
Phantom 3 standard can be used with our app anyway, but there are some
limitations/changes to the standard behaviour of our app.
- most of the tutorial screens shown when first using the app are deactivated
- it is currently not possible to switch between drone and ground perspective (missing c1 button on the remote controller)
- taking fotos and recording videos is not possible by default
- using an additional bluetooth remote/game controller can solve this problem; see here
8.2 Sony Xperia ZX Premium - 4K smartphone
The
Sony Xperia ZX Premium has an outstanding feature that makes it perfect for VR/fpv purposes -
a 4K display...
... in theory.
Unfortunately Sony decided that the usable resolution for 3rd party apps is locked to Full HD (1920*1080) by default - with the exception of some media content.
We already requested a feature that allows 3rd party apps to activate 4K resolution in the
Sony forum - without success so far..
To be able to use the full 4K resolution anyway, some "tweaks" are needed.
- you have to enable "Developer mode" on your android device - see here how that works
- you need to download the Android Studio development environment by google - see here
- connect your Android device to your PC via USB cable
- open a command line in the directory sdk\platform-tools
- in the command line, type "adb shell"
- enter "wm size 2160x3840" to switch to 4K resolution
- enter "wm density 800" to adapt the size of the icons to a reasonable size
- see this forum for details
- now you can run CAVU (and all other apps) in 4K
- to switch back to default resolution, please
- enter "wm size 1080x1920" to switch to Full HD resolution
- enter "wm density 400" to adapt the size of the icons to a reasonable size
Please note that the
Sony Xperia X5 Premium already had a 4K display - but due to a slow processor
we do not recommend using it in 4K mode.
8.3 Quanum DIY FPV Goggle V2 PRO (non-VR)
If your smartphone does not have a high resolution but you want to try flying fpv anyway, you can try the Quanum DIY FPV Goggle V2 PRO, some non-VR goggles.
Compared to other VR headsets, this uses a single lens - both eyes will see the same display. With that, no 3D effect is possible - but the full resolution of the smartphone display can be used for both eyes.
It cost around 30-60$ and comes with a 5" TFT monitor.
You can replace the monitor with your smartphone easily.
Please note that the fpv experience is a bit less immersive than with other devices, but it's a good compromise for smartphones with lower resolution.
9 Developer/beta mode
The app contains some features that are useful during app development or new features that are still under development and not yet released to all customers.In order to activate the developer/beta mode, please tap the image in the main menu 7 times.
You will see a short popup telling you that developer mode was enabled.
The following sections will describe the features contained in developer mode.
You might also find new features all over the app.
Check out our
Release Notes so see what we are currently working on an what might already be in the app...
9.1 Set background images for screenshots
We need to make screenshots of the app for documentation purposes from time to time.
If you long press the image in the main menu, there is an option that allows to set/reset background images.
9.2 Developer: Show CPU load in HUD
To keep an eye on the smooth performance of the app, it is useful to see how much CPU load it produces in certain situations.For this purposed we added a developer option that allows to add a "CPU load" display on the flight screen.
Open the developer options menu and enable the corresponding option.
9.3 Disable the 3D effect of the flight data displays (HUD)
Some users feel blurred when the HUD images are "floating" above the video image.
In order to deactivate the 3D effect, an option "Disable 3D HUD" is available in the developer options menu.
(in later versions of the app this option might be moved so that it is available for all users).
10 Legal information
Information about the CAVU FPV privacy policy and used open source software can be found here.